Paper Crafts
How to make a Paper Butterfly – DIY Folding Butterfly – Paper Craft

Hello readers! Today you’re going to make an amazing paper butterfly right! The colorful wings of them make us wonder that How any creature can be so beautiful! Let me tell you something about butterflies, they are a kind of insect which everybody adores. They have different types of wings which are really interesting!
Butterflies represent youth and beauty. That’s why it’s perfect to be done by a kid. But not the beauty outside inside also, as the butterflies first were a caterpillar which is ugly to everyone but then it broke that cover and transformed itself to this beautiful living being. Today you will be making this beautiful creature in paper form. Kids will love the process. So, why are you waiting! Let’s learn it!
How to Make a Paper Butterfly
Materials:
- A green square paper of 16c.m/ 6.2 inch.
- Two red colour square papers of 13c.m/ 5.1inch.
- A colour paper strip.
- Two yellow colour small colour circles.
- Two sky colours are smaller than the previous circles.
- Two very small point-like white circles.
- A very small paper strip like the same colour as the previous strip.
- A glue stick.
- Scissors.
Procedure:
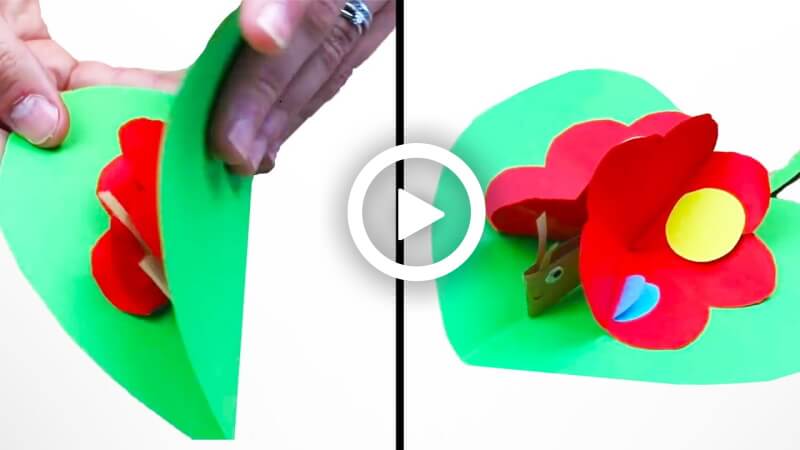
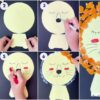
- Take a red-coloured square paper of 13c.m/ 5.1inch, place it like a diamond shape on your desk and fold it from up and down by making a triangle shape and middle fold line.
- Fold the triangle from down to up by making another triangle shape.
- Do the same step with this triangle shape again.
- Cut the sharp corner edge of the triangle roundly with scissors.
- Open the piece and a flower-like shape will be in front of your eyes.
- Cut the middle bottom of the flower a little straightly with scissors.
- Apply glue on the cut areas with a glue stick then put a cut portion over another.
- Fold the paper in half.
- Release then a half flower-like shape will be ready.
- Take another red-coloured square paper of 13c.m/ 5.1inch, do the same by following this process.
- They will be the wings of the butterfly.
- Take a light colour wide paper strip, fold it in half and then attach the end with the glue stick.
- It will be the butterfly’s body.
- Take two very small point-like white circles, and draw two points on them with a black marker.
- They will be the butterfly’s eyes.
- Take these circles and attach them to the sides of the folded part of the strip with the glue stick.
- Take a very small paper strip like the same colour as the previous strip, fold it into half and cut two same pieces with scissors.
- Attach these pieces on the sides over the eyes of the butterfly.
- They will be the butterfly’s strings.
- Take the red wings you made previously, take the wings and apply glue on its side with the glue stick.
- Take the butterfly body and attach it to the wings sidewise.
- Take another wing and attach it to the side of the body with the glue stick.
- Take two yellow colour small colour circles and two sky colours smaller than the yellow circles, attach them on the sides of the wings with the glue stick.
- Your butterfly is complete!
- Take a green square paper of 16c.m/ 6.2 inches, fold it into half sidewise.
- Cut the non-folded part of the paper roundly like a half heart shape.
- Open the paper it will make a heart shape.
- Make a strip with the rest of the green paper and attach it to the upper middle of the heart shapes with the glue stick.
- It will look like a fruit.
- Take the butterfly and attach it to this with a glue stick.
- Attach property with the help of your hand.
- Your paper butterfly will be ready!
P.S- You can use different colour paper as per your help.
Your beautiful butterfly is ready to fly! As you can see this process is so ready that anybody could make them. Kids can easily make them by following this procedure. Use your creativity and make as many of them as you can. Use your skills to add more shine and beauty to the butterflies. Use them as gifts, the receiver will love them and will be impressed by their creativity. We all know butterflies roamed around flowers, so the paper flowers perfectly suit the butterflies and it looks great! You can also use them to decorate your room, house, office, and stuff. So, let’s take hold of your materials and make these precious butterflies.
Read More:
- How to Create A Paper Toy- Spinning Top
- How to Make A Colorful Paper Cube
- How to Make an Origami Lotus Flower
- How to Make A Paper Rabbit
- How to Make A Moving Paper Toy- An Elephant